
But this being our parenting blog, I want to start by explaining why I felt the need to build big expensive speakers.
A few years ago all we had to play music in our home was a little tiny bluetooth speaker, and at some point I realized that wasn't cutting it if I want my children to experience music powerfully in our home. That little speaker didn't get loud enough, it couldn't play most of the bass notes, and it didn't sound too great (although, for its size it was amazing). Growing up, I had so many poignant experiences with music that gave me peace or excitement or a greater understanding of God's love for me, and they are experiences that could only have come through music. They shaped who I am, especially in those turbulent teenage years. I want our children to have music as a major part of their lives so they can have those kinds of experiences, and it shouldn't just be through headphones alone in their rooms. Music is supposed to be social as well!
So we bought some excellent bookshelf speakers, and it really changed our home life. We started playing music more often (but not too often). We started having family dance parties. We added, as part of their homeschool curriculum, weekly playlists of songs to teach them the sound of different genres and artists. We started mixing in bedtime songs played from the speakers (and making them lie down and just listen).
All of this happened not only because we had better speakers, but because they were more convenient. We have a Spotify Premium account ($5/month for students!) and a couple Google Home Minis, and we plugged a Chromecast Audio into the speakers so they connect to the Google Home setup as well, so Kathy just says while she's in the middle of doing Mommy things, "Hey, Google, shuffle our rap playlist," and our Spotify rap playlist just starts playing from the bookshelf speakers. If it's too loud, she tells Google to turn it down. This convenience factor may be the biggest thing that has increased our music playing in the home.
But why wasn't this good enough? Well, it probably was. It accomplished our purpose. But, ever since buying those bookshelf speakers, I'd been reading about the science of sound reproduction, and I discovered Sigfreid Linkwitz's website. He's amazing, and his writings convinced me that I could build a set of speakers he designed for less than my recent inheritance I got and that they would sound as good as possibly anything else in the world. So, justifying that I want those speakers before my kids are grown up so they don't miss out on the amazingness as well, I went for it. Now on to the build log . . .
Day 0: The Prep
The most time-wasting part of any project is having to run to the hardware store over and over (or, worse, waiting on parts to be shipped), so this was the most important part of getting these speakers completed very quickly. I strongly recommend thinking through every single step and visualizing what you will need. Here are the things I needed:
Pre-sanding
- Random orbital sander for the sides, sanding block for the edges
Upper baffle adjustments for hiding the wires
- Power grinder
- 90-degree angle drill attachment
- Long drill bit
- Slot cutter router and bits
Putting together the baffles
- Wood glue (only 2 bottles)
- Clamps (corner clamps and bar clamps)
- Wood filler (for any random imperfections)
Painting
- Spray paint (I think I used about 15 cans)
- Giant plastic sheeting
- Blocks to rest the pieces on
- Tack cloth
Wiring
- 18-gauge 2-conductor wire (I used less than 50 feet)
- Flag spade terminals (for making the tweeter and midrange driver connections)
- Regular spade terminals (for making the Speakon chassis connections)
- Speakon chassis (NL4MP x2 and NL8MP x2)
- Speakon chassis mounts (had to get a metal shop specially make ones to fit the NL8MPs)
- Electrical tape
- Heat shrink tubing (looks awesome for covering any non-insulated terminals)
- Good crimping tool and wire stripper multi-tool
- Wire clips (the things that hold the wires in place on the woofer baffles)
Finishing work
- Clear polyurethane
- Long screws to attach the upper baffle to the bridge
Speaker cables
- 8-conductor and 4-conductor snake cables
- Banana plugs (for the amplifier end)
- Speakon connectors (for the speaker end, NL4FC x2 and NL8FC x2)
What I wish I would have known beforehand:
- Order everything way in advance of when you'll need it in case anything goes wrong with the shipping
- Get tons of spray paint cans and return the unused ones at the end
- List all the hardware you'll need and buy it all at the local hardware store rather than ordering online (so you don't pay for shipping or for more than you'll need), if you want black hardware just spray paint the ones that you can't find in black
- Preferentially buy the terminals that have a place to crimp to the insulation as well as to the bare wire because they connect so much more solidly
- Don't worry if you can't find insulated terminals--electrical tape (for hidden places) and heat shrink tubing are easy alternatives
- Use less glue than you think when gluing the tweeter sub-baffles and tweeters in place--the glue expands as it's drying and will seep out and look ugly
- Get extra terminals so you can practice making good connections first
Day 1: Prep Sanding (time: about 2 hours)

Madisound flat pack all ready for sanding.

Some minor imperfections from cutting. This was the worst of it, but it was on a non-visible side. Overall, the flat pack was super well done and it was totally worth it because of the many hours it saved.

Using the random orbital sander on the sides.

Using the sanding block on the edges so they don't get rounded by the random orbital sander.

A helpful daughter stacking the completed pieces out of the way. This work is so much better with other people.

I vacuumed off the sawdust but shouldn't have because we made modifications to the upper baffle that left sawdust on everything again.
Day 2: Upper baffle modifications to hide wiring, gluing and screwing all the pieces together (time: about 6 hours with two of us working together on it)

Using the slot cutter to make some slots to run the wiring around the edges of the midrange drivers.

Beautiful and super fast and easy with the right tools.

Drilling the hole to run the wires from one midrange driver to the next. Need to use the 90 degree angle attachment.

Using the super long drill bit so it could reach all the way up to drill a wire channel connecting the upper midrange hole to the lower tweeter hole.

We actually had to cut the drill bit a little shorter first after trying it full length. Don't cut it too short!

Using a grinder to widen the entrance and exit of the holes so the wires aren't forced to bend at too sharp of an angle.

Nice wide entrance to the channel connecting the two midrange holes.

You can kinda see in this picture that Madisound kindly pre-cut a channel connecting the two tweeter holes, which ends up being hidden after you glue the tweeter sub-baffles on.

We decided to have all the wires exit at that hole so they'd be hidden inside the upper baffle stand.

Smart idea to make sure you don't drill too deep.

We ground out that exit hole as well, again so the wires don't have to make a 90 degree turn. It also would have been really difficult to feed them through and get them to come out that hole without that grinding. We cut a bunch of pieces of wires and pushed them through the holes we drilled to make sure they would all fit easily. From this view, you can see all the slots and channels we cut. Baffle adjustments done! If I understand Mr. Linkwitz's writings correctly, none of this affects the sound of the speakers. But they're going to look darn clean on the back!

We glued the woofer boxes together first. First do a test by putting them together without glue when they're lying on their sides so you make sure everything fits the way you want. Some pieces were a little tight but trading them with the other woofer box's pieces solved it.

Then disassemble, put in the glue, reassemble, and quickly adjust all the pieces so their edges meet up flush together. Then clamp and be ready to use lots of paper towels to wipe off the excess glue that squishes out. Do it quickly before it dries. Four hands was a must for this step.

Lots of glue squishing out. Look everywhere or you won't notice some spots where glue has squished out.

That front piece has a clamp as well because it will try to shift and then not be flush with all the edges around it. If it isn't perfect, after it dries you can sand down the edges until they are all flush again, which we had to do with the first one, as well as various other edges of the woofer boxes to make them look perfect. But once it's done you can't even tell we did that.

Gluing together the bridges next. Corner clamps were great. The sides ended up angling slightly inward even with the corner clamps, so we should have cut a piece of wood to put between the feet of the bridge so the sides would be parallel while they were drying. But this was solved with some gentle flexing them outward after they were dry.

See how the bridge feet are touching the bottom of the woofer box? It wasn't too bad of a fix though.

Next we glued and screwed the upper baffles. We used a stack of blocks and layers of veneer to make sure the distance between the upper baffle base and the upper baffle itself were perfect and even, then screwed them together while the glue was still wet.

Uh oh! The screws Madisound provided were almost poking through the front of the upper baffle. We backed them off a bit and sanded the front smooth again. Problem solved.

We screwed a hold in the base of the upper baffle. That's where the screw will go through that connects it with the bridge.

The matching hole in the bridge. We drilled them dead center of both pieces, which ended up being perfect.

Gluing the sub-baffles on. We should have used less glue. Again, 4 hands was a must so each person could make sure his side's sub-baffle was perfectly aligned before clamping them in place.

After assembling, we gently sanded the edges to round them off a tiny bit so no edges will splinter off one day and expose unpainted wood.

We also sanded down the edges to make them all perfectly flush.

Fully assembled! Front view.

More views.

More views. You can't really see it in this picture, but the one modification we made to the woofer box is drilling a hole in the upper part of the v-frame on the side (a different side on each box since I planned to have the Speakon chassis mounted on the side rather than in the middle). That hole is the channel that the wires from the upper woofer will travel through to the backside. Then we used an air compressor to blow away all the sawdust so they were ready for spray painting.
Day 2-4: Painting (time: 3-5 hours each night)

There are some tricks to making them look good even though they're spray painted. Starting with the wood and the paint all being the same temperature (look at the paint's instructions) is super important to avoid bubbles or whatnot. Doing lots of thin-ish layers each painting session--it's a balance though, you want to do layers that are thick enough that you're putting down a reasonable about of paint each time but not so much that there's even the beginning of drops forming.

Drying after the first day of painting. I should have laid down plastic in the entire garage. That would have saved a lot of sweeping time at the end.

After letting those first several layers dry over 24 hours, very lightly sand (so the paint has something to stick to) and then use tack cloth to get rid of all the sanding dust. Then paint a whole bunch more thin layers.

Using the tack cloth.

Drying after round 2 of giving them several layers. I'd made a mistake on one of the upper baffles by putting too thick of a layer on it, so I had to let it dry for 24 hours and then sand until it was smooth again before painting that next day. They still looked horrible after round 2 of painting and I was starting to get worried. Plus, I'd noticed that I'd missed some spots--the inside of the midrange driver holes (which are visible from the back) and the underside of the main upper baffle piece. So on day 3, I sprayed a whole bunch more layers, making sure not to miss those sections, and magically there was finally enough layers on them to make it look a nice deep black and smooth and beautiful. Apparently I didn't take a picture, but I also brush painted the bottoms of all the pieces with a few layers of clear polyurethane so in case any moisture gets on them, the undersides won't be completely unprotected.

Even after all those paint layers, I still didn't quite get everywhere on the insides of the slots we'd cut in the edges of the midrange driver holes, but Sharpie looks the same black, so nobody will ever see it.

On these painting days, I also sprayed the backs of the midrange drivers with the same black spray paint. Maybe there's curved painters tape out there, which would have saved a lot of time because I was trying to use straight tape to perfectly cover a round surface, which took a zillion little pieces. I also found a small nail that had the perfect head diameter to stick in the middle hole to protect it from getting paint inside. I stood it upside down so it was easy to get off at the end.

I realized after removing the tape and cover paper that I hadn't done a good job getting the vertical edges/sides of the drivers, so they aren't perfectly painted black. The things only I will notice when I look at my speakers.

On the quickest painting day, I also assembled the speaker cables. It took a fair amount of work figuring out how to get all the wires (and the right colors in the right places) installed into the Speakon part.

I found that holding pressure with my thumb once I'd installed a few of them helped those ones stay connected while I installed the rest. I wore gloves just in case my skin oils would be bad for the bare wires (uncertain). You can see behind was my drawing of which colors should be assigned which spots in the Speakon piece. This was determined based on the info contained in the OPLUG forum's thread entitled "Crosstalk in 8 core speaker cable."
Day 5-6: Wiring and driver mounting (time: about 12 hours)

I'd done the recommended testing with a battery and some cables to ensure I knew which driver terminal was the positive one, and I put a piece of tape on each driver to help me remember. This ensures they are wired with the right polarity. You can also see in this picture the flag terminals, which were small enough to fit into the small space when they're mounted since they don't stick up as far as that chrome back plate.

The right tools for the job.

I ran all the wires through the channels down to the back of the upper baffle's base and mounted the drivers. There's no picture, but I didn't want to glue the tweeters in place yet so I used elastic bands to just hold them in place until the wiring stuff was done. Also, you can't really see it, but I didn't end up doing anything to keep the wires in the channels because they kind of just stayed in place. Others have used caulking to seal them in. You can see that the wires jut straight out from the midrange drivers and then U-turn back in. Had I used flag terminals for those connections as well, I think they would have been even less noticeable, but they look cool enough as is. Notice that I labeled each individual wire with tape, which saved a lot of trouble of trying to figure out which one was which when it was time to connect them all to the Speakon chassis.

I'd forgotten that the tweeters are connected in series, so I had to just connect their wires down here with a terminal and then I covered it with electrical tape.

Attaching the wires to the Speakon chassis. I was still waiting for the metal mount to be adjusted so that it would fit properly.
Day 7: Finishing touches (time: about 6 hours)

The terminals provided by Madisound for the woofer connections didn't come with insulators, but using a little heat shrink tubing made them look super professional. Here's the before.

And here's the after. And since this is the first picture showing the mounted woofers, I'll say that having four hands to mount them made it really easy to seat them. My wife reached through from the back to stabilize while I lowered them in place. Don't forget to do the bottom one first. And when doing the top one, I had plenty of room to seat it without even having to remove the rubber piece off the back of it or anything. Just hold it horizontally until it's over the hole, then you can angle it down in, no problem. I couldn't reach the top two screws to screw it in place, so I just left them. Mr. Linkwitz wasn't too worried about a few of those screws not being in place, and my woofers never ever rattle. But for all the other screws, it's good to tighten them each a little at a time and alternating sides kind of like putting a car tire on.

After I finally did glue the tweeters in place and then gently clamp them, I came back to find that the glue had expanded out. My first mistake was not using adhesive caulk like Mr. Linkwitz recommended. My second mistake was using too much glue. Use less than you think you'll need! These have lower risk of rattling so it shouldn't be a worry. I eventually was able to cut off that protruding glue with an exacto knife, which was a slow and risky process trying not to scratch the surrounding paint or the tweeter cover.

Wiring on the back of the woofer boxes. I don't love it. But getting those clips to screw into the sides of the woofer boxes was such an effort (trying not to damage the woofer surrounds) that I left it at only using two. Maybe one day I'll do something different to beautify that wiring. Also notice the metal mount that I spray painted black. It looks awesome for $2 off the internet. The upper baffle mounts cost me $30 each because they had to be custom made by a local sheet metal worker. Quite the hassle.
Conclusion

They ended up looking way more amazing than I'd expected!

All the little imperfections along the way are essentially invisible to everyone but me.

From the back. You can't see it in the picture, but there is a long screw and a nut connecting the upper baffle to the bridge. I leave it loose enough that I can rotate the upper baffle any direction. I plugged these into my new 8-channel Nord amp (with Hypex N-Core modules), my pre-built ASP from Madisound, my SMSL DAC, and with a Chromecast Audio receiving digital files from Spotify or Tidal (I'll cancel my Tidal subscription if I become certain that I can't hear the difference between 320 kbps Spotify and "Master" quality Tidal).
But how do they sound? They sound just as advertised. They disappear. They create a huge wall of sound. Their bass is clean and covers the low bass perfectly. Their transient response is pristine. They have so much headroom that I turn them up as loud as I'm willing to listen and it's still distortionless. I am completely satisfied by them, and I had very high expectations after reading so much about them.
I did some comparisons to our AudioEngine A5+ bookshelf speakers, and the difference really is huge. The AudioEngines have that characteristic boxy sound. Now I understand what that means because it's easy to hear, including during SPL-matched ABX testing. They also accentuate the mid bass more than I realized before, and they completely lack the deep bass (as expected for bookshelves). And they don't have the same ability to create the huge wall of sound or fill the house as fully as the LX521.4s do.
I have to say, though, that after doing those comparisons, I would say that the AudioEngines are pretty amazing for their price. They get me 80% of the way there for $500. Had I not heard the LX521.4s, I don't think I would have known how much better music could sound in my home, and I would have assumed that they were getting me 95% of the way there. My friend, after listening to both sets of speakers, compared it to eating a $20 stake and thinking, "This is really good." And then you eat an $80 stake and you think, "I had no idea what I was missing out on. This is what a stake can taste like." I thought that was a perfect analogy that describes how good music sounds from our new speakers.
So now when my wife says, "Hey, Google, shuffle my Mozart playlist," the Chromecast Audio starts playing ultimate-fidelity music out of our LX521.4s, and we are living happily and blissfully ever after. And a huge shout out to my great friend, Danny, whose hands you see doing all the work in so many of the pictures. His expertise is truly what made them turn out so beautifully.
But why wasn't this good enough? Well, it probably was. It accomplished our purpose. But, ever since buying those bookshelf speakers, I'd been reading about the science of sound reproduction, and I discovered Sigfreid Linkwitz's website. He's amazing, and his writings convinced me that I could build a set of speakers he designed for less than my recent inheritance I got and that they would sound as good as possibly anything else in the world. So, justifying that I want those speakers before my kids are grown up so they don't miss out on the amazingness as well, I went for it. Now on to the build log . . .
Day 0: The Prep
The most time-wasting part of any project is having to run to the hardware store over and over (or, worse, waiting on parts to be shipped), so this was the most important part of getting these speakers completed very quickly. I strongly recommend thinking through every single step and visualizing what you will need. Here are the things I needed:
Pre-sanding
- Random orbital sander for the sides, sanding block for the edges
Upper baffle adjustments for hiding the wires
- Power grinder
- 90-degree angle drill attachment
- Long drill bit
- Slot cutter router and bits
Putting together the baffles
- Wood glue (only 2 bottles)
- Clamps (corner clamps and bar clamps)
- Wood filler (for any random imperfections)
Painting
- Spray paint (I think I used about 15 cans)
- Giant plastic sheeting
- Blocks to rest the pieces on
- Tack cloth
Wiring
- 18-gauge 2-conductor wire (I used less than 50 feet)
- Flag spade terminals (for making the tweeter and midrange driver connections)
- Regular spade terminals (for making the Speakon chassis connections)
- Speakon chassis (NL4MP x2 and NL8MP x2)
- Speakon chassis mounts (had to get a metal shop specially make ones to fit the NL8MPs)
- Electrical tape
- Heat shrink tubing (looks awesome for covering any non-insulated terminals)
- Good crimping tool and wire stripper multi-tool
- Wire clips (the things that hold the wires in place on the woofer baffles)
Finishing work
- Clear polyurethane
- Long screws to attach the upper baffle to the bridge
Speaker cables
- 8-conductor and 4-conductor snake cables
- Banana plugs (for the amplifier end)
- Speakon connectors (for the speaker end, NL4FC x2 and NL8FC x2)
What I wish I would have known beforehand:
- Order everything way in advance of when you'll need it in case anything goes wrong with the shipping
- Get tons of spray paint cans and return the unused ones at the end
- List all the hardware you'll need and buy it all at the local hardware store rather than ordering online (so you don't pay for shipping or for more than you'll need), if you want black hardware just spray paint the ones that you can't find in black
- Preferentially buy the terminals that have a place to crimp to the insulation as well as to the bare wire because they connect so much more solidly
- Don't worry if you can't find insulated terminals--electrical tape (for hidden places) and heat shrink tubing are easy alternatives
- Use less glue than you think when gluing the tweeter sub-baffles and tweeters in place--the glue expands as it's drying and will seep out and look ugly
- Get extra terminals so you can practice making good connections first
Day 1: Prep Sanding (time: about 2 hours)

Madisound flat pack all ready for sanding.

Some minor imperfections from cutting. This was the worst of it, but it was on a non-visible side. Overall, the flat pack was super well done and it was totally worth it because of the many hours it saved.

Using the random orbital sander on the sides.

Using the sanding block on the edges so they don't get rounded by the random orbital sander.
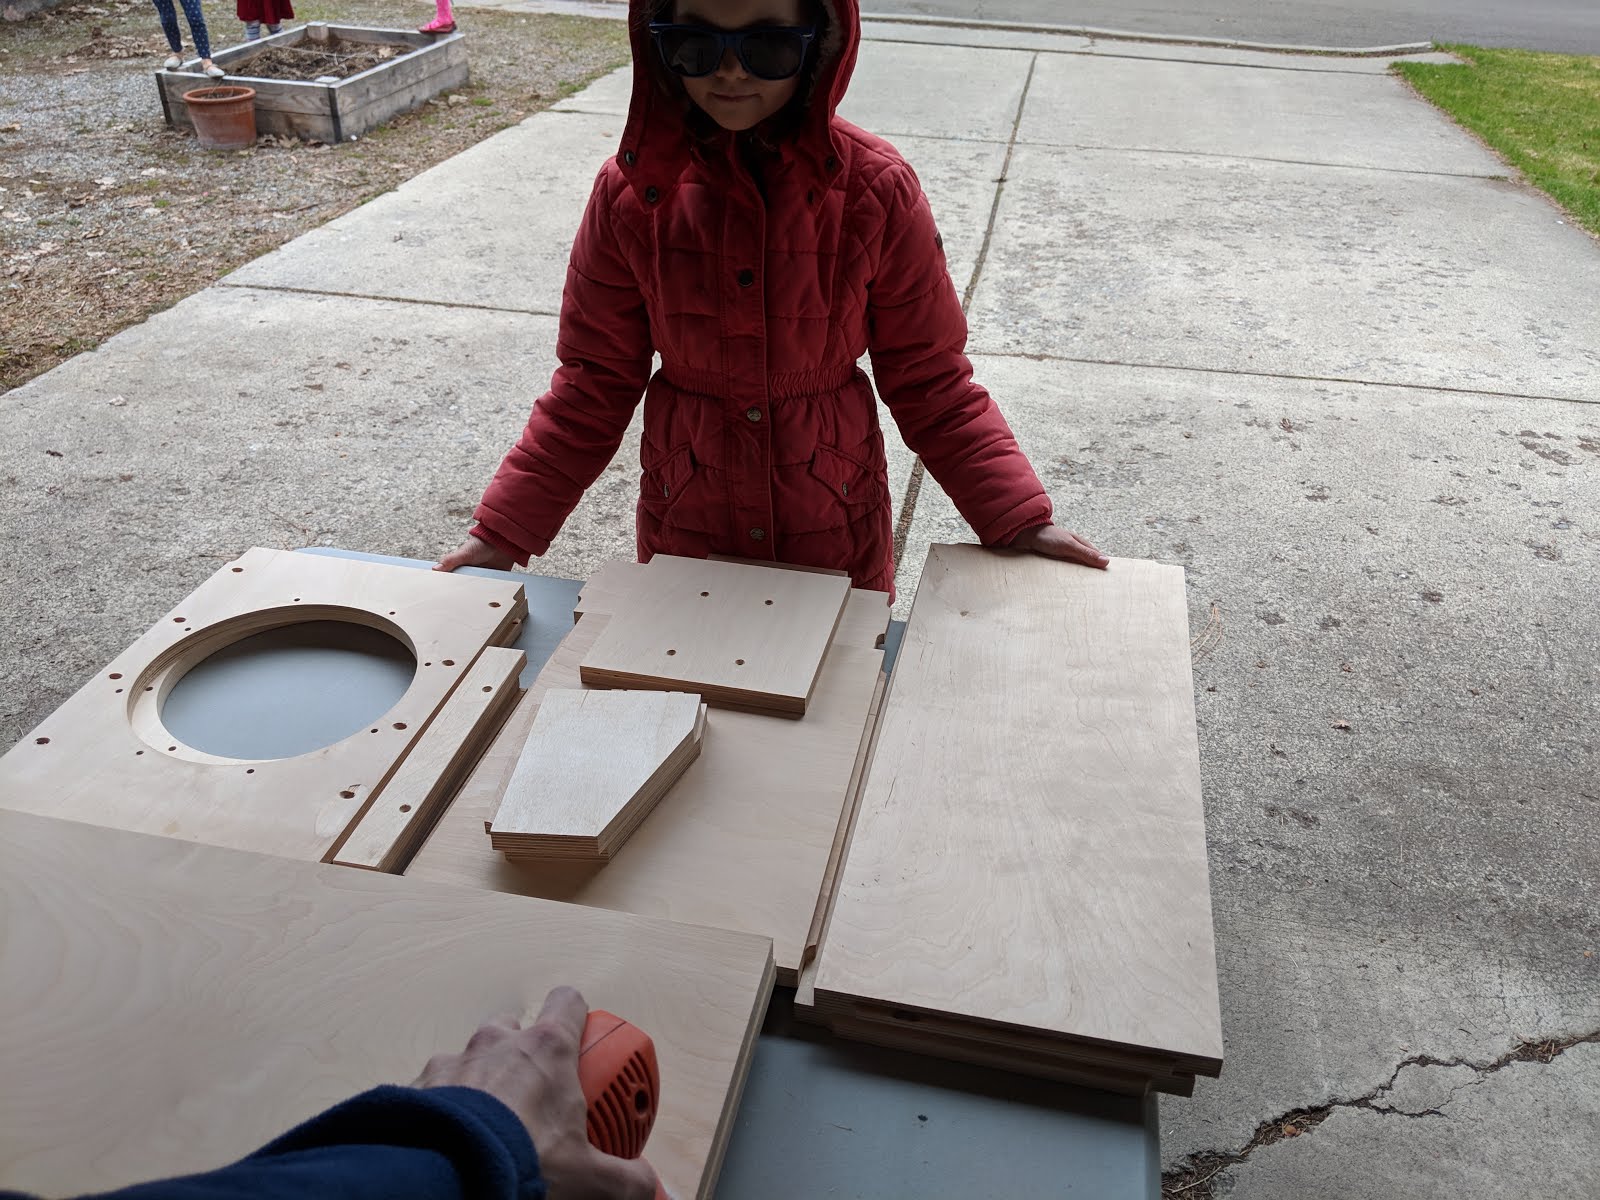
A helpful daughter stacking the completed pieces out of the way. This work is so much better with other people.

I vacuumed off the sawdust but shouldn't have because we made modifications to the upper baffle that left sawdust on everything again.
Day 2: Upper baffle modifications to hide wiring, gluing and screwing all the pieces together (time: about 6 hours with two of us working together on it)

Using the slot cutter to make some slots to run the wiring around the edges of the midrange drivers.

Beautiful and super fast and easy with the right tools.

Drilling the hole to run the wires from one midrange driver to the next. Need to use the 90 degree angle attachment.

Using the super long drill bit so it could reach all the way up to drill a wire channel connecting the upper midrange hole to the lower tweeter hole.

We actually had to cut the drill bit a little shorter first after trying it full length. Don't cut it too short!

Using a grinder to widen the entrance and exit of the holes so the wires aren't forced to bend at too sharp of an angle.

Nice wide entrance to the channel connecting the two midrange holes.

You can kinda see in this picture that Madisound kindly pre-cut a channel connecting the two tweeter holes, which ends up being hidden after you glue the tweeter sub-baffles on.

We decided to have all the wires exit at that hole so they'd be hidden inside the upper baffle stand.

Smart idea to make sure you don't drill too deep.

We ground out that exit hole as well, again so the wires don't have to make a 90 degree turn. It also would have been really difficult to feed them through and get them to come out that hole without that grinding. We cut a bunch of pieces of wires and pushed them through the holes we drilled to make sure they would all fit easily. From this view, you can see all the slots and channels we cut. Baffle adjustments done! If I understand Mr. Linkwitz's writings correctly, none of this affects the sound of the speakers. But they're going to look darn clean on the back!

We glued the woofer boxes together first. First do a test by putting them together without glue when they're lying on their sides so you make sure everything fits the way you want. Some pieces were a little tight but trading them with the other woofer box's pieces solved it.

Then disassemble, put in the glue, reassemble, and quickly adjust all the pieces so their edges meet up flush together. Then clamp and be ready to use lots of paper towels to wipe off the excess glue that squishes out. Do it quickly before it dries. Four hands was a must for this step.

Lots of glue squishing out. Look everywhere or you won't notice some spots where glue has squished out.

That front piece has a clamp as well because it will try to shift and then not be flush with all the edges around it. If it isn't perfect, after it dries you can sand down the edges until they are all flush again, which we had to do with the first one, as well as various other edges of the woofer boxes to make them look perfect. But once it's done you can't even tell we did that.

Gluing together the bridges next. Corner clamps were great. The sides ended up angling slightly inward even with the corner clamps, so we should have cut a piece of wood to put between the feet of the bridge so the sides would be parallel while they were drying. But this was solved with some gentle flexing them outward after they were dry.

See how the bridge feet are touching the bottom of the woofer box? It wasn't too bad of a fix though.

Next we glued and screwed the upper baffles. We used a stack of blocks and layers of veneer to make sure the distance between the upper baffle base and the upper baffle itself were perfect and even, then screwed them together while the glue was still wet.

Uh oh! The screws Madisound provided were almost poking through the front of the upper baffle. We backed them off a bit and sanded the front smooth again. Problem solved.

We screwed a hold in the base of the upper baffle. That's where the screw will go through that connects it with the bridge.

The matching hole in the bridge. We drilled them dead center of both pieces, which ended up being perfect.

Gluing the sub-baffles on. We should have used less glue. Again, 4 hands was a must so each person could make sure his side's sub-baffle was perfectly aligned before clamping them in place.

After assembling, we gently sanded the edges to round them off a tiny bit so no edges will splinter off one day and expose unpainted wood.

We also sanded down the edges to make them all perfectly flush.

Fully assembled! Front view.

More views.

More views. You can't really see it in this picture, but the one modification we made to the woofer box is drilling a hole in the upper part of the v-frame on the side (a different side on each box since I planned to have the Speakon chassis mounted on the side rather than in the middle). That hole is the channel that the wires from the upper woofer will travel through to the backside. Then we used an air compressor to blow away all the sawdust so they were ready for spray painting.
Day 2-4: Painting (time: 3-5 hours each night)

There are some tricks to making them look good even though they're spray painted. Starting with the wood and the paint all being the same temperature (look at the paint's instructions) is super important to avoid bubbles or whatnot. Doing lots of thin-ish layers each painting session--it's a balance though, you want to do layers that are thick enough that you're putting down a reasonable about of paint each time but not so much that there's even the beginning of drops forming.

Drying after the first day of painting. I should have laid down plastic in the entire garage. That would have saved a lot of sweeping time at the end.

After letting those first several layers dry over 24 hours, very lightly sand (so the paint has something to stick to) and then use tack cloth to get rid of all the sanding dust. Then paint a whole bunch more thin layers.

Using the tack cloth.

Drying after round 2 of giving them several layers. I'd made a mistake on one of the upper baffles by putting too thick of a layer on it, so I had to let it dry for 24 hours and then sand until it was smooth again before painting that next day. They still looked horrible after round 2 of painting and I was starting to get worried. Plus, I'd noticed that I'd missed some spots--the inside of the midrange driver holes (which are visible from the back) and the underside of the main upper baffle piece. So on day 3, I sprayed a whole bunch more layers, making sure not to miss those sections, and magically there was finally enough layers on them to make it look a nice deep black and smooth and beautiful. Apparently I didn't take a picture, but I also brush painted the bottoms of all the pieces with a few layers of clear polyurethane so in case any moisture gets on them, the undersides won't be completely unprotected.

Even after all those paint layers, I still didn't quite get everywhere on the insides of the slots we'd cut in the edges of the midrange driver holes, but Sharpie looks the same black, so nobody will ever see it.

On these painting days, I also sprayed the backs of the midrange drivers with the same black spray paint. Maybe there's curved painters tape out there, which would have saved a lot of time because I was trying to use straight tape to perfectly cover a round surface, which took a zillion little pieces. I also found a small nail that had the perfect head diameter to stick in the middle hole to protect it from getting paint inside. I stood it upside down so it was easy to get off at the end.

I realized after removing the tape and cover paper that I hadn't done a good job getting the vertical edges/sides of the drivers, so they aren't perfectly painted black. The things only I will notice when I look at my speakers.

On the quickest painting day, I also assembled the speaker cables. It took a fair amount of work figuring out how to get all the wires (and the right colors in the right places) installed into the Speakon part.
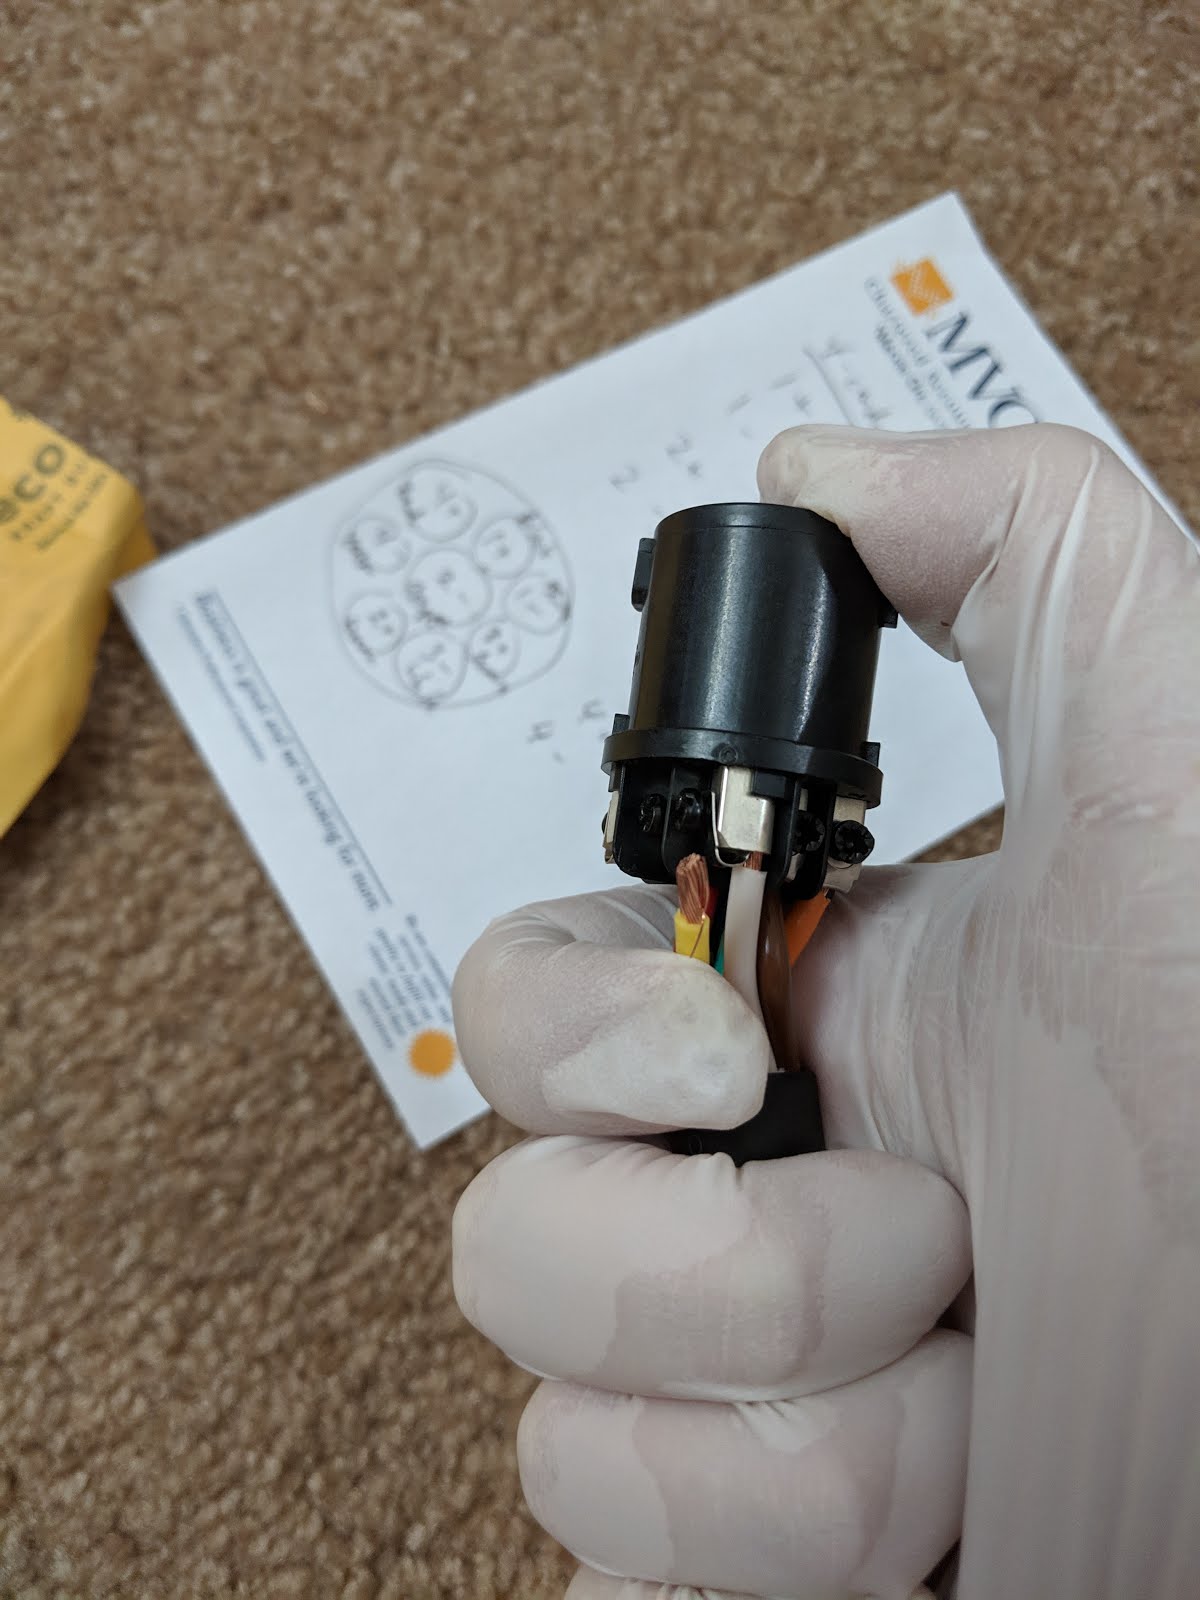
I found that holding pressure with my thumb once I'd installed a few of them helped those ones stay connected while I installed the rest. I wore gloves just in case my skin oils would be bad for the bare wires (uncertain). You can see behind was my drawing of which colors should be assigned which spots in the Speakon piece. This was determined based on the info contained in the OPLUG forum's thread entitled "Crosstalk in 8 core speaker cable."
Day 5-6: Wiring and driver mounting (time: about 12 hours)

I'd done the recommended testing with a battery and some cables to ensure I knew which driver terminal was the positive one, and I put a piece of tape on each driver to help me remember. This ensures they are wired with the right polarity. You can also see in this picture the flag terminals, which were small enough to fit into the small space when they're mounted since they don't stick up as far as that chrome back plate.

The right tools for the job.

I ran all the wires through the channels down to the back of the upper baffle's base and mounted the drivers. There's no picture, but I didn't want to glue the tweeters in place yet so I used elastic bands to just hold them in place until the wiring stuff was done. Also, you can't really see it, but I didn't end up doing anything to keep the wires in the channels because they kind of just stayed in place. Others have used caulking to seal them in. You can see that the wires jut straight out from the midrange drivers and then U-turn back in. Had I used flag terminals for those connections as well, I think they would have been even less noticeable, but they look cool enough as is. Notice that I labeled each individual wire with tape, which saved a lot of trouble of trying to figure out which one was which when it was time to connect them all to the Speakon chassis.

I'd forgotten that the tweeters are connected in series, so I had to just connect their wires down here with a terminal and then I covered it with electrical tape.

Attaching the wires to the Speakon chassis. I was still waiting for the metal mount to be adjusted so that it would fit properly.
Day 7: Finishing touches (time: about 6 hours)

The terminals provided by Madisound for the woofer connections didn't come with insulators, but using a little heat shrink tubing made them look super professional. Here's the before.

And here's the after. And since this is the first picture showing the mounted woofers, I'll say that having four hands to mount them made it really easy to seat them. My wife reached through from the back to stabilize while I lowered them in place. Don't forget to do the bottom one first. And when doing the top one, I had plenty of room to seat it without even having to remove the rubber piece off the back of it or anything. Just hold it horizontally until it's over the hole, then you can angle it down in, no problem. I couldn't reach the top two screws to screw it in place, so I just left them. Mr. Linkwitz wasn't too worried about a few of those screws not being in place, and my woofers never ever rattle. But for all the other screws, it's good to tighten them each a little at a time and alternating sides kind of like putting a car tire on.

After I finally did glue the tweeters in place and then gently clamp them, I came back to find that the glue had expanded out. My first mistake was not using adhesive caulk like Mr. Linkwitz recommended. My second mistake was using too much glue. Use less than you think you'll need! These have lower risk of rattling so it shouldn't be a worry. I eventually was able to cut off that protruding glue with an exacto knife, which was a slow and risky process trying not to scratch the surrounding paint or the tweeter cover.

Wiring on the back of the woofer boxes. I don't love it. But getting those clips to screw into the sides of the woofer boxes was such an effort (trying not to damage the woofer surrounds) that I left it at only using two. Maybe one day I'll do something different to beautify that wiring. Also notice the metal mount that I spray painted black. It looks awesome for $2 off the internet. The upper baffle mounts cost me $30 each because they had to be custom made by a local sheet metal worker. Quite the hassle.
Conclusion

They ended up looking way more amazing than I'd expected!

All the little imperfections along the way are essentially invisible to everyone but me.

From the back. You can't see it in the picture, but there is a long screw and a nut connecting the upper baffle to the bridge. I leave it loose enough that I can rotate the upper baffle any direction. I plugged these into my new 8-channel Nord amp (with Hypex N-Core modules), my pre-built ASP from Madisound, my SMSL DAC, and with a Chromecast Audio receiving digital files from Spotify or Tidal (I'll cancel my Tidal subscription if I become certain that I can't hear the difference between 320 kbps Spotify and "Master" quality Tidal).
But how do they sound? They sound just as advertised. They disappear. They create a huge wall of sound. Their bass is clean and covers the low bass perfectly. Their transient response is pristine. They have so much headroom that I turn them up as loud as I'm willing to listen and it's still distortionless. I am completely satisfied by them, and I had very high expectations after reading so much about them.
I did some comparisons to our AudioEngine A5+ bookshelf speakers, and the difference really is huge. The AudioEngines have that characteristic boxy sound. Now I understand what that means because it's easy to hear, including during SPL-matched ABX testing. They also accentuate the mid bass more than I realized before, and they completely lack the deep bass (as expected for bookshelves). And they don't have the same ability to create the huge wall of sound or fill the house as fully as the LX521.4s do.
I have to say, though, that after doing those comparisons, I would say that the AudioEngines are pretty amazing for their price. They get me 80% of the way there for $500. Had I not heard the LX521.4s, I don't think I would have known how much better music could sound in my home, and I would have assumed that they were getting me 95% of the way there. My friend, after listening to both sets of speakers, compared it to eating a $20 stake and thinking, "This is really good." And then you eat an $80 stake and you think, "I had no idea what I was missing out on. This is what a stake can taste like." I thought that was a perfect analogy that describes how good music sounds from our new speakers.
So now when my wife says, "Hey, Google, shuffle my Mozart playlist," the Chromecast Audio starts playing ultimate-fidelity music out of our LX521.4s, and we are living happily and blissfully ever after. And a huge shout out to my great friend, Danny, whose hands you see doing all the work in so many of the pictures. His expertise is truly what made them turn out so beautifully.
No comments:
Post a Comment